🎨 White-Labelling
When self-hosting your own instance of Retrospected, you have the possibility of customising the colours and the logo so they are more in line with your company's branding.
White-Labelling, or customising colours and logo, is entirely optional. You can skip this section if you don't need it.
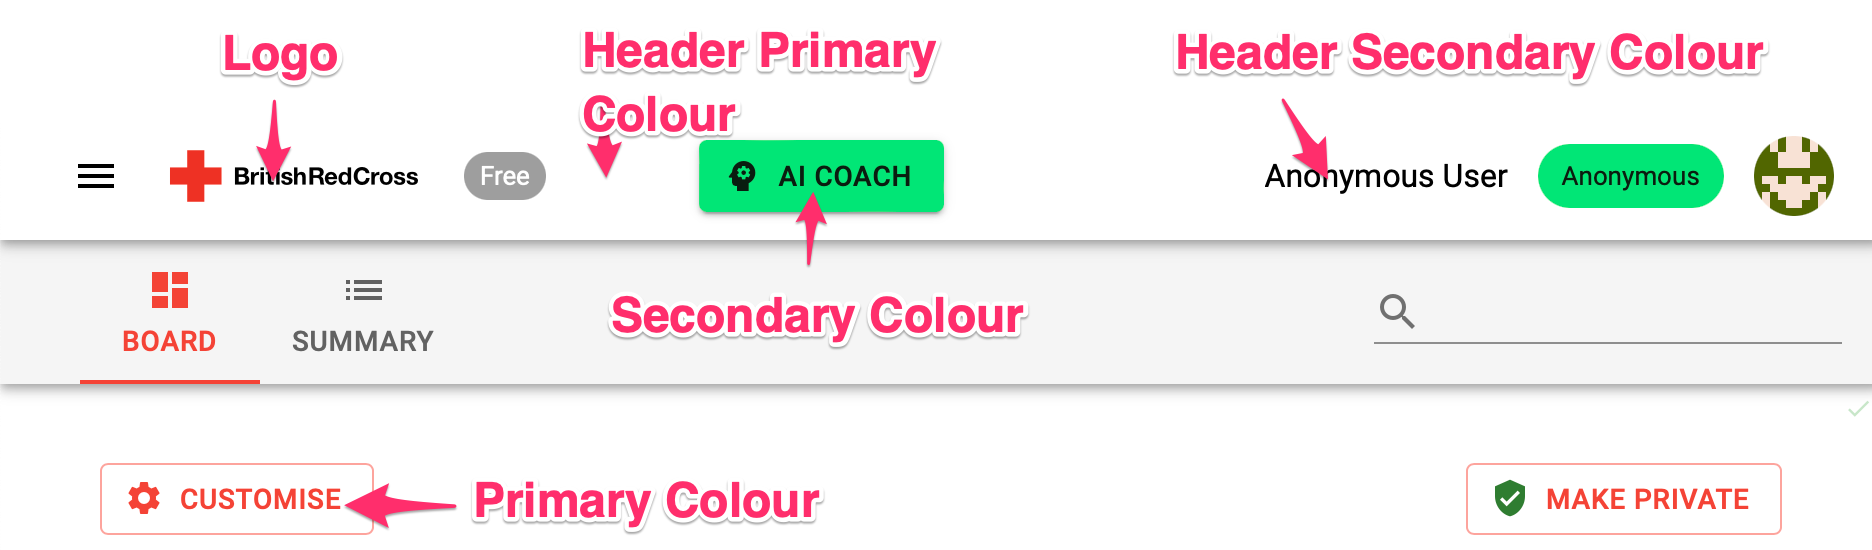
As an example, we can easily re-brand Retrospected to fit with the British Red Cross colours:
What can I configure
You have the ability to change 4 details:
- The Primary colour (this is the colour of most components, purple by default)
- The Secondary colour (this is the colour of some secondary components, like buttons, pink by default)
- The Header colour (by default, it takes the primary colour, but you can choose something else)
- The Logo
How can I configure it
All the following are to be set in the docker-compose.yml file, in the frontend section.
Alternatively, you can set this up using the docker-compose editor here.
The frontend section of your docker-compose.yml file would look similar to this:
frontend:
  image: retrospected/frontend:latest
  depends_on:
    - backend
  ports:
    - '80:80' # Change the first 80 to whatever port you want to access Retrospected from
  environment:
    FRONTEND_PRIMARY_COLOR: '#ffebee,#ffcdd2,#ef9a9a,#e57373,#ef5350,#f44336,#e53935,#d32f2f,#c62828,#b71c1c,#ff8a80,#ff5252,#ff1744,#d50000'
    FRONTEND_SECONDARY_COLOR: '#e8f5e9,#c8e6c9,#a5d6a7,#81c784,#66bb6a,#4caf50,#43a047,#388e3c,#2e7d32,#1b5e20,#b9f6ca,#69f0ae,#00e676,#00c853'
    FRONTEND_HEADER_PRIMARY_COLOR: '#FFFFFF'
    FRONTEND_HEADER_SECONDARY_COLOR: '#000000'
    FRONTEND_LOGO: 'https://acme.com/your-icon.jpg'
Configure the Primary and Secondary colours
Both the Primary and the Secondary colours are actually a palette of 14 colours.
You can see examples of this here: https://materialui.co/colors/.
You must choose 14 colours, that are each a variation of each other, from very light to very dark.
This is an example with a red-ish colour, as seen in the Red Cross example above:
You will notice that the list of 14 colours is a list of 14 HEX RGB colours, separated by commas.
FRONTEND_PRIMARY_COLOR: '#ffebee,#ffcdd2,#ef9a9a,#e57373,#ef5350,#f44336,#e53935,#d32f2f,#c62828,#b71c1c,#ff8a80,#ff5252,#ff1744,#d50000'
Do the same for the secondary colour, with 14 other colours.
Example:
FRONTEND_SECONDARY_COLOR: '#e8f5e9,#c8e6c9,#a5d6a7,#81c784,#66bb6a,#4caf50,#43a047,#388e3c,#2e7d32,#1b5e20,#b9f6ca,#69f0ae,#00e676,#00c853'
Configure the Header colours
The header colour is simpler: it is just two colours, to be defined this way:
FRONTEND_HEADER_PRIMARY_COLOR: '#FFFFFF'
FRONTEND_HEADER_SECONDARY_COLOR: '#000000'
Configure the Logo
The logo can either be a URL (the URL needs to be accessible from your app), or in the Image URI format (recommanded).
In order to get an Image URI, you can use the following service: https://ezgif.com/image-to-datauri.
You'll be able to transform any JPEG, PNG or SVG image into this text format, and then set it that way:
FRONTEND_LOGO: 'data:image/svg+xml;base64,PD94bWwgdmVyc[...]+Cg=='
Alternatively, you can set the logo as a URL:
FRONTEND_LOGO: 'https://dorkingtownpartnership.co.uk/wp-content/uploads/2021/10/British-Red-Cross.jpeg'
Please ensure your value starts with data:image and ends with ==. The value can be quite long if the image is big.